This given tutorial educates you on the topic of how to configure Hyper-V and create Virtual Machines in Windows 10/8/7.
How to configure and use Hyper-V in Windows 11/10
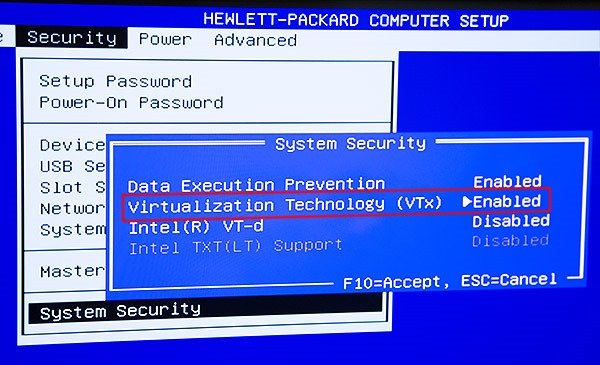
In the first place, make sure that hardware virtualization support is turned on in the BIOS settings.
Only after confirming the hardware virtualization support is available and enabled, proceed further. Enable Hyper-V in the “Turn Windows features on or off” dialog. For doing so, type “Turn Windows features” in the search box of settings search charms-bar and select the dialog from the right-hand pane.
Next, configure Networking for the Hyper-V environment. Before proceeding any further, make sure that a virtual switch has been created and that it is functional. To check this, open the Virtual Switch Manager, which you’ll find on the Actions panel in the Hyper-V Manager (Type Hyper-V at the Start Screen to find the Hyper-V Manager).
After clicking on “Virtual Switch Manager” in the Actions pane ensure that “External” is highlighted, and then click on the “Create Virtual Switch” button.
If you have more than one NIC in your system, ensure that you have selected the NIC to be used for VM external network connections.
There are many different ways to create VMs, create a VM from scratch using PXE boot from the network. For creating a VM, you just click on “New Virtual Machine…” under “Actions” on the right panel in the Hyper-V Manager. A “New Virtual Machine Wizard” should pop up on your computer screen. Choose a VM name and specify a path for the VM file.
Next, switch to ‘Assign Memory’ section. Here, although you can select from the range (8-13642 MB), allocate more than the minimum amount of memory to the virtual machine. So, specify the required amount.
Then, from the right-pane choose the ‘Configure Networking option and switch to Virtual you created earlier in earlier steps.
Next, choose ‘Connect Virtual Hard Disk’ and check the ‘Create a Virtual Hard Disk’ option. Click ‘Finish’.Before proceeding any further, create a Legacy Network Adapter in VM settings. For this,
Launch the settings dialog for the VM that needs network boot support, and then click “Add Hardware” from the left pane. When the ‘Add Hardware’ section expands in the right column, hit the ‘Add’ button and make sure that the proper virtual switch is used. Read: How to create Hyper-V Virtual Machine Desktop Shortcut Once done, the VM becomes ready for PXE boot and the installation of the OS. Upon noticing and clicking the green “Start” button for your VM in the right pane of the Hyper-V Manager, you’ll be presented with the familiar PXE boot menu where you can press F-12 for a network boot.
This works just like network booting from a physical machine. Check out the usage of network boot to start a clean Windows 7 install.
Once you have your VMs setup, there are two options for interacting with and connecting to your Virtual Machines: the Hyper-V Manager and the Remote Desktop Connection using Remote Desktop Protocol. Windows Home user? This post will show you how to install and enable Hyper-V on Windows 11/10 Home. Read next: Understanding how Hyper-V will work on Windows.

